

Bookish Instagrams are all the rage right now, especially ones with themes. A theme is a common editing style, prop, style, etc. that sets bookish accounts apart from each other. For example, my bookstagram theme consists of dark backgrounds and cool/blue tones. There may be themes that are similar to mine; however, no one exactly edits their photos the way I do, and no one has the same background as I do.
This post contains my tips, tricks, and advice on how to edit your photos. I am not a professional photographer or photo editor, but the apps I use make it easy to edit my photos how I like them. That being said, this is what works for me, and I hope it will work for you. Since I use my iPhone to take my Bookstagram pictures, the two apps I use to edit my photos are really convenient.
The two apps I use to edit my photos are VSCO and Watermark P (optional but recommended). All of these apps are free so this post is very broke girl/guy friendly. There are roughly five steps I take to completely edit my photos, and hopefully I can explain them all clearly!

1. Determine A Signature Theme
As I mentioned above, themes are taking bookstagram by storm, but that doesn’t mean that they are necessary. I choose to feature a theme because I love the look of a matching bookstagram feed and it allows my photos to stay consistent.
There are so many themes on Instagram but they all can be categorized into two broad themes: light and dark.
Here are some examples:

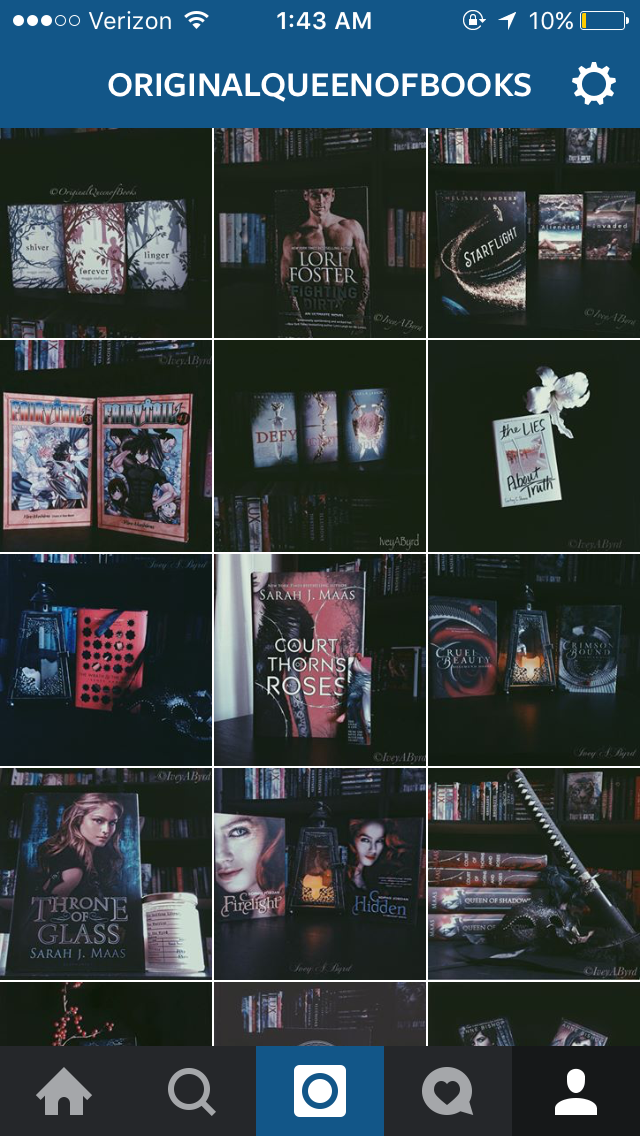

My bookstagram feed, OriginalQueenofBooks, is obviously dark. However, we all know the famous light themes on Instagram that usually show a book on a bed, a cup of tea/coffee, and the ever famous sock covered legs. That signature theme is used often on bookstagram because it is simplistic, eye-catching, and light.
Bookstagram pictures with a theme also usually have the same or a similar background (i.e. a table top, bed, bookshelf, outside, etc.) which also adds to an accounts signature look. I based my theme solely around my beautiful black bookshelves and there are usually the background to all of my photos. I choose a dark and cool toned theme to compliment my bookshelves because I knew that would be my background. Plus, I wanted my account to stand out from the usually light bookstagram photos.
2. Take Your Picture

1) The biggest part of this step is lighting. Diffused lighting is your friend here. What do I mean by diffused light? I mean taking your picture in front of a window with the blinds slightly closed or taking the photo on a cloudy day. Harsh lighting will be your enemy when it comes time to edit.
2) Don’t worry about how the picture looks right now. Everything will look average at this stage. All you have to do is make sure that your picture isn’t blurred and your iPhone is focused on the main object you want shown. However, if your picture isn’t as clear as it possibly can be, you can fix it in editing.
3) My next tip is to take as any pictures as you can until you feel like you have a good variety to choose from. I would also suggest changing the layout and moving the book(s) around until you are happy with their position.
4) My last tip for this step is to not be afraid to use props. For example, I will often use the swords I have as props when I photograph fantasy novels like Queen of Shadows, or I will use a fake flower just to add another element to the photo. It can get boring when you just post pictures of a book without a prop to look at. Move those around too until you find the position that best frames the book. Then go through your camera roll and delete all of the pictures that you don’t like, that are too blurry, or pictures where the lighting is off.
3. Editing Your Photo
This is where I realized that VSCO was my best friend. VSCO comes with a few filters and one of them happened to be what I wanted my theme to be. I also love this app because it has a library of its own that holds all of your edited photos and you can easily tell if your photos match your theme. (P.s. I always crop my photo to the square format in my camera roll editing tab before I even start editing in VSCO)

1) The very first thing you should do is play with the filters and figure out which one you like. I found out that the filter P5 on VSCO was the perfect filter for me because it had dark and cool tones in it, and it also had that slightly cloudy look that I like. Some people would leave it at that, but I like to customize the filter so that it looks better. I will layout the steps I take to edit my photos below:

• Exposure: Exposure controls the amount of light in a photo. Decreasing the exposure decreases the amount of light in a photo. I usually decrease the exposure by 1 or 2 since my Bookstagram theme is dark.

• Contrast: The contrast controls the scale of black and white in your photos. By reducing the contrast, I am adding more white into my photo and dulling the bright colors so that my theme remains dark.

-If you want to add more shadows and increase the brightness of the white in your photo then increase the contrast.
• Sharpness: Sharpness controls the resolution of your photos. I always increase the sharpness of my photos, but the number I increase it by isn’t always consistent. I never want to make the photo look grainy so I always test it to see what works the best.

-All you want to do is make the small details that are lost in the picture stand out.
• Saturation: Saturation enhances the difference between the colors in a photo making them appear brighter or duller. It is essential for me to decrease the saturation of my photos because I don’t want bright colors in my theme.

-For lighter themes, I suggest increasing the saturation slightly to bring out the colors in your photo so that they will stand out.
• Temperature: Changing the temperature of a photo changes that tone of your photo to warm or cool. If you decrease the temperature you are left with a cool toned photo, but if you increase the temperature then you are left with a warm toned photo. Adjusting the temperature of my photo is the last step I take in the editing stage. This is how I achieve that cool toned/blue tint in my pictures.

-I always decrease the temperature of my photo by 1 or at the most 3. My theme is dark and cool so decreasing the temperature is essential.
-If you have a lighter theme then you might want to increase the temperature and bring out the warmth in your photo unless you are going for a grungy look.
Now you can save your photo to your camera roll, and move on to the last step!

4. Placing Your Bookstagram Name On Your Photo
This step is optional. In fact, I didn’t start doing it until recently, but it helps to make your theme unique. Watermark P is the app I use to put my stamp on my photos and it is so easy. The app features a ton of fonts to choose from which is so cool.

1) Choose the font that you love the most or the font that you feel goes with your theme the best. My front is very elegant, which I feel like matched my theme perfectly.


3) Also, I always decrease the opacity to about 60% visibility so that my signature doesn’t completely stand out and it isn’t stark white against my dark background. I also make my signature fairly small, but not small enough that you can hardly read it.
4) Now you are ready to save your photo to your library!

That is it! That is how I edit my photos for my Bookstagram account! I really hope you guys found this post interesting and helpful! Remember, I am not an expert by any means, but I know what I like in my photos so I had to share my tips and tricks. Let me know if you found this post helpful, and leave your bookstagram accounts below or follow my bookstagram account by using the link in my sidebar! I would love to see more beautiful pictures of books!
Until next time, read some good books and take some gorgeous pictures for me!
Cheers!
No comments:
Post a Comment